
Zoho Account: So, you’ve decided it’s time to part ways with Zoho. Maybe you’ve found a better solution, or perhaps you’re simply looking to declutter your digital life. Whatever the reason, closing your Zoho account is a straightforward process. Here’s how to do it.
-
Log in to Your Zoho Account:
- Visit the Zoho login page (https://www.zoho.com/login.html).
- Enter your Zoho username and password.
-
Access Your Zoho Settings:
- Once logged in, look for the “Settings” or “Preferences” icon. It’s usually located in the top right corner of the screen.
- Click on it to access your account settings.
-
Find the “Close Account” Option:
- Within the settings menu, search for the “Close Account” or “Deactivate Account” option. It might be under a section like “General” or “Account Management.”
- If you can’t find it, try using the search bar within the settings to locate it.
-
Confirm Your Decision:
- Zoho will likely ask you to confirm your decision to close the account. This is a safety measure to prevent accidental closures.
- Read the confirmation message carefully and make sure you’re ready to proceed.
- Click the “Close Account” or “Deactivate Account” button to proceed.
-
Follow Any Additional Instructions:
- Zoho might have additional steps or requirements before finalizing the closure. These could include exporting your data or confirming that you’ve resolved any outstanding issues.
- Follow the on-screen instructions carefully to complete the process.
-
Verify Closure:
- After closing your account, try logging in again to verify that it’s deactivated. If you’re unable to log in, your account has been successfully closed.
Closing your Zoho account is a straightforward process, but it’s important to follow the right steps to ensure your data is properly handled. Whether you’re moving to a new platform or simply no longer need Zoho services, this step-by-step guide will help you through the process.
Backup Your Data
Before you close your account, it’s crucial to back up any important data. Zoho provides various services like CRM, Mail, and Books, each containing vital information. Go to the specific app from which you need data and export your files. For example, in Zoho CRM, you can export contacts, leads, and accounts in CSV format. Ensuring your data is safe will prevent any potential losses after closing your account.
Cancel Subscriptions
If you have any active subscriptions to Zoho services, cancel them before closing your account. Go to the Zoho Subscriptions page from your account dashboard, find the services you’re subscribed to, and follow the steps to cancel. Be aware that Zoho doesn’t offer refunds for unused services, so it’s best to cancel close to your renewal date.
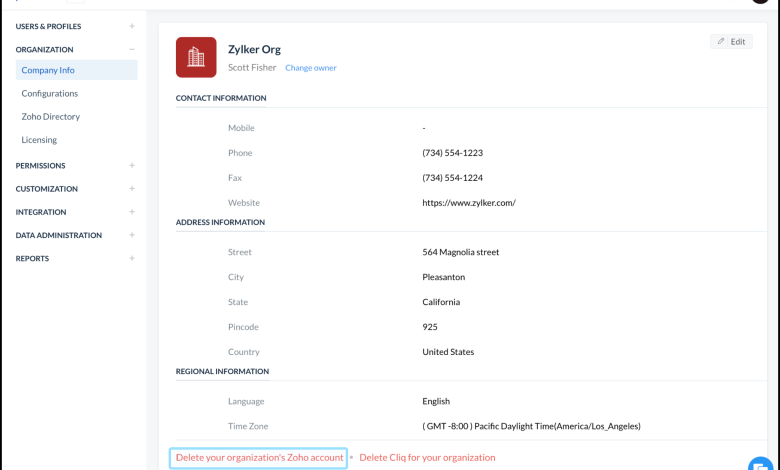
Access the Account Settings
Log in to your Zoho Account and navigate to the My Profile section. From there, click on the Close Account option. Zoho will display a warning about the permanent nature of account deletion. Read the message carefully to understand that this action will erase all data across Zoho apps.
Provide a Reason
Zoho asks users to provide a reason for closing their account. Choose the appropriate reason from the dropdown menu or provide your own if none fit. This feedback is optional but can help Zoho improve its services.
Confirm Closure
After confirming your reason, click Close Account. Zoho may send a confirmation email to ensure the request is legitimate. Once confirmed, your Zoho account will be permanently deleted.
By following these steps, you can safely and securely close your Zoho account.
Conclusion:
Closing your Zoho account is a relatively simple process, but it’s important to take your time and follow the steps carefully. Before closing your account, ensure you’ve exported any necessary data and resolved any outstanding issues.
If you’re looking for a Zoho partner to help you with the process or explore alternative solutions, consider iTecZone. As a certified Zoho partner with a team of experienced developers, iTecZone can provide top-tier services for all Zoho applications.